The Lab – Gear Check – Hak5 Field Kit

I’ve talked about individual pieces that are in the field kit before, including the USB Rubber Ducky, and the LAN Turtle.  The Field Kit has both of those, plus lots more.

Hak5 Field Kit 1
Hak5 Field Kit 1

We’ll start with the stylish zippered case.  It has the “Hak5 TRUST YOUR TECHNOLUST” logo on the front.  There is also a key ring tag that says “REMOVE BEFORE FLIGHT” on one side and “TRUST YOUR TECHNOLUST” on the other.  I have this attached to the zipper for every day carry use.

Inside are several elastic straps sewn into each side and on the spine.  These are positioned to hold various items neatly in place.

Hak5 Field Kit 2
Hak5 Field Kit 2

The kit includes a DVB-T+DAB+FM USB SDR radio receiver with magnetic mount antenna. I already owned two of these due to my HAM Radio hobby, so having an extra is nice.  This can be used in conjunction with GNU Radio (or other software) to receive and decode various signals and digital modes.

It includes a LAN Turtle and USB Rubber Ducky (with all Ducky accessories) which I also already had one of, so spares are nice.

There is a non turtle USB Ethernet Adapter, as well as a USB wireless adapter (with antenna.)  These help provide a little extra networking on the go, if needed.  They are especially useful in conjunction with a WiFi Pineapple (Nano or Tetra) which did not come with the kit I purchased, but is often an option that can be included.

There is also a USB multi meter for checking voltage/amp and other readings for a USB socket, as well as analyzing how much draw you are generating with your peripherals.  If you’re drawing too much, you’ll want to get a beefier power source for your gear, so it’s good to keep an eye on these things.

Finally, an assortment of cables and adapters for USB (including a micro USB to micro USB OTG cable, and self winding Ethernet cable) round out the mix.

I’ve added the battery pack from my WiFi Pineapple Nano to the kit, but the Nano itself stays in its own holster outside of the kit.  This way I don’t accidentally take it to work with me.

The kit normally cost around $170 when I bought it, but that kit is no longer available on the site, and I got it at discount when they ran the “Mr Robot” special for the USB Rubber Ducky cameo that aired on that show.

There are several kits available on the shop at this time, and this is the closest one to what I have, but it contains a lot more gear and is priced a bit higher because of it.  If you add up the cost of components bought separately, it’s still a good deal, and looks like it’s on sale today.  That may change in future.

Hak5 Elite Field Kit

It’s well worth the money if you can afford a kit and want some goodies for your lab.  If the link above is dead by the time you get to this, and I haven’t noticed and cleaned it up, here’s the link to their shop with all the various kits that should be available.

SSH Start to Finish Architecture – Standing up the CA

Before we get to the meat of the discussion, we need to set up some definitions.  Last week we mentioned that the Certificate Authority can produce certificates for both hosts and users.  We’re going to cover both today.  If it looks like we’re being repetitive, we’re really not.  Pay attention to which section you are in when following along, since flags will vary.

    Definitions:

  • Certificate Authority (CA) – The trusted third party that signs keys to produce certificates.
  • User Key – The user public key that will be signed by the CA to produce a user certificate.
  • Host Key – The host public key that will be signed by the CA to produce a host certificate.
  • User Certificate – The certificate generated by the CA from the user key provided.  This reduces the need for AuthorizedKeysFile or AuthorizedKeysCommand.
  • Host Certificate – The certificate generated by the CA from the host key provided.  This simplifies the known_hosts management, and makes this process more secure.
  • Principal – A means of restricting validity of the certificate to a specific set of user/host names. By default, generated certificates are valid for all users or hosts.
  • Trust – In order for a CA issued certificate to work, the server needs to be told to trust the CA before it will accept user certificates, and the client needs to be told to trust the CA before it will accept host certificates.
  • Key Revocation List – A means of revoking keys and certificates when they are no longer valid.
  • Validity Lifetime – A means of restricting the lifetime of a certificate’s validity.  If a certificate becomes invalid after a limited time frame, it will need to be re-issued with a new validity lifetime.  This allows for automatic revocation of certificates in case managing the Key Revocation List overlooks an intended removal.
  • Additional Limitations – Further restrictions can be applied to the certificates along the same lines as the public key prefix options discussed in a previous blog post.

The first thing we need to do after standing up and hardening the machine where the CA will live is add the unprivileged user that will be used for signing keys to issue certificates.

sudo groupadd -g 3000 sshca
useradd -m -u 3000 -g sshca -G sshca -c "SSH Certificate Authority Signing User" -s /bin/bash -d /home/sshca sshca

Now we need to build out the directory structure.

sudo -i -u sshca
mkdir -p {hostca,userca}

Next, we need to create the key what will be used for issuing HOST certificates.

cd hostca
ssh-keygen -t rsa -b 4096 -f host_ca -C "Host Certificate Signing Key"

We also need to create the key that will be used for issuing USER certificates.

cd ../userca
ssh-keygen -t rsa -b 4096 -f user_ca -C "User Certificate Signing Key"

At this point, there are two files in each directory. The private key file will have no extension, and the public key file will have the “.pub” extension. All certificates will be signed using the private key file, but we also need that public key file, so don’t discard it.

In order to create the TRUST needed for a server to recognize USER CERTIFICATES signed by our CA, we need to push that USER CA public key to each host, and set a configuration option.  You can place it anywhere, but I recommend making a subdirectory under the /etc/ssh directory to store these keys.

sudo mkdir -p /etc/ssh/sshca

Then copy the pub file over from the CA and stick it in this directory. Edit the /etc/ssh/sshd_config file to include this directive:

TrustedUserCAKeys /etc/ssh/sshca/user_ca.pub

Restart sshd (or force it to reload its configuration file) and this trust should now be created.

In order to take advantage of this trust, the user’s logging into the server need their public key to be signed by the USER CA.  This issues a certificate that will need to be given back to the user.

The syntax for signing a key looks like this:

ssh-keygen -s <ca_key> -I <certificate_identity> [-h] -n <principals> -O <options> -V <validity_interval> -z <serial_number> <public_key_to_be_signed>

The “ca_key” is the private key for the USER CA when signing user public keys, or the private key for the HOST CA when signing host public keys.

The “certificate_identity” is a “key identifier” that is logged by the server when the certificate is used for authentication. It is a good idea to use a unique identifier for this that is recognizable by your organization, since you can set up trust for multiple CAs.  For our example, the certificate_identity will be “unixseclab.”

If this is a HOST KEY being signed, ensure that you include the “-h” flag.

The “principals” are a list of users that can be authenticated with this USER CERTIFICATE.  Alternatively, it is a list of hosts that can be authenticated with this HOST CERTIFICATE.  Multiple principals may be allowed, separated by commas.  It is highly recommended that you actually set the principal to the username of the user or hostname of the server it is being issued for.  Blanket authentication can create forensic issues.

The “options” are a list of restrictions that can be applied.  These are like the prefixes we mentioned before.  Be aware that the newest versions of OpenSSH have changed one behavior regarding forced commands. Also note, that “options” are only valid for USER CERTIFICATES.  You would leave off the “-O <options>” when issuing HOST CERTIFICATES.

From Undeadly:

As of OpenSSH 7.4, when a forced-command appears in both a certificate and an authorized keys / principals “command=” restriction, sshd will now refuse to accept the certificate unless they are identical.  The previous (documented) behavior of having the certificate forced-command override the other could be a bit confusing and error-prone.

The “validity_interval” is used to set not only the expiration date of the issued certificate, but to also set a beginning date in case it should only become valid in the future.

Finally, the “serial_number” is an arbitrary number that can be assigned to make KEY REVOCATION easier.

The HOST CERTIFICATE that gets issued should go in the same directory as the HOST KEYS.  The sshd_config file needs to be modified to include a new “HostCertificate” for each new HOST CERTIFICATE issued.  The HOST KEY must also still exist, and must have its own “HostKey” entry in the sshd_config file.  Don’t remove them in exchange for the certificate entries.

HostKey /etc/ssh/ssh_host_rsa_key
HostKey /etc/ssh/ssh_host_ecdsa_key
HostCertificate /etc/ssh/ssh_host_rsa_key-cert.pub
HostCertificate /etc/ssh//etc/ssh/ssh_host_ecdsa_key-cert.pub

When the server has been configured to offer a HOST CERTIFICATE, the client side needs to also be configured to TRUST the CA that signed it.  To do this, we need to add the following entry to the user’s “known_hosts” file:

@cert-authority *.example.com <public key of the HOST CA that signed the host keys>

It may be necessary to remove existing host key entries in the known_hosts file for this host if it was recently migrated to use certificates.  A clean way to handle this is to make a back up copy of your known_hosts, zero the file out, and add only the certificate lines (by hand.)  Then any time you run into a non-certificate host, you can compare the offered key to your known good key in your backup copy, and accept if it’s good for the hosts that don’t use certificates, yet.

This is a good stopping spot for today’s post.  It ran longer than I expected, so next week we’ll cover Key Revocation Lists, Certificate Inspection, and run the actual example of generating our initial CA, signing a host key, and signing a user key, then using them to allow a client to connect to a server.  I wanted to include that recording this week, but I didn’t realize how long this post was going to get before I planned that out.

Thanks for reading, and a quick “thank you/shout out” to the folks at the CRON.WEEKLY newsletter for the pingback on last week’s article in this series for their issue #63!

Fun-Day Friday – Mastermind Game

I originally planned to cover Settlers of Catan this week, but we didn’t get to play last weekend, so I’m saving it for a later post.  Instead, we’re going to cover Mastermind, which is a very fun logic game.

Mastermind
Mastermind

The game plays similarly to Battleship in that there is a “blind” to keep the “guessing” player from seeing the other player’s code, and pegs are used to indicate a guess, and to mark a success or failure.

One player sets a code, flips the blind up so that the other player can’t see the code, then the other player is allowed to see the board.  There are 6 different colored large pegs, as well as black and white smaller pegs.  The colors are red, blue, green, yellow, white, and black.

The board ten rows across the board that contain four small peg holes at each end of the row, as well as four total large peg holes across the middle of the row.  The player doing the guessing has to pick colored pegs to place in the larger peg holes, to indicate that they guess that’s what the code is behind the blind.

The person that set the code then compares the guess against the code and places a white peg for each guessed peg that is a correct color, but in an incorrect location, and a black peg for each guessed peg that is both a correct color and in a correct location into the four smaller peg holes on one side of the row.  Once these pegs have been placed, if any, it is the other player’s turn to make a new guess.

If the code is correct, the code maker can flip the blind up to indicate a win.

The other side of the board can be used to mark how many wins each player has had.  This makes it possible to extend a “game” by playing multiple matches until one player or the other wins an agreed upon number of matches.  It also makes it possible to extend the number of guesses before saying a player “loses” by marking one of these for a full ten rows of guesses before clearing the board to try again (which would also make the game harder, since you lose the history of attempts, doing that.)

Finally, some people raise the difficulty by allowing there to be missing pegs.

Matches are usually fast paced, so this game can take as little as a few minutes to as long as several hours, depending on house rules and how many matches constitute a full “game.”

Mastermind is fun, addictive, and very good at teaching logic for younger players.  It is highly recommended.

The Lab – Gear Check – The Raspberry Pi

Today, we’ll take a look at the Raspberry Pi.  The Raspberry Pi is currently at “Pi 3” but our lab has a Pi 2 model B, which is what we will cover.

Raspberry Pi 2
Raspberry Pi 2

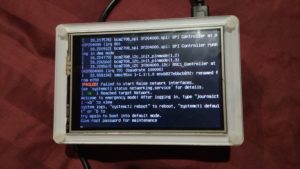
The original plan for the Pi was to create a very small and portable attack device, using Kali linux as the OS installation.  I mused over what to do about a screen, when I came across another blog post that covered how to set this up with one of the little screens sold by AdaFruit.

Re4son’s blog post gave some initial instructions that I tried to follow, but they didn’t work for me at first.  I bought the smaller 2.8″ screen on accident, and the menu size didn’t match.  I tried mucking with those settings, but there were SO many menus that needed adjusting, that it just wasn’t worth my time.  I bought the bigger 3.5″ screen and tried again.  I had a little more success, but the last time I rolled with this, I had issues with the Greenbone setup for Open-VAS.  I think it was probably an issue with the version of Kali I was at at the time.  I shelved this project, and haven’t picked it back up.  I will probably give it a go again, because his blog post has evolved even more since I last followed it.

Now that I have the Nexus 10 with Nethunter on it, this specific project will be a lower priority for a while, though.  My use for this until then will focus on using this as one of the target machines, either for configuration management examples, or as an actual vulnerable machine (with configuration issues being the primary vulnerabilities.)

The Pi 2 has a quad core 900Mhz ARM Cortex-7 processor from Broadcom.  It includes 1 Gig of RAM, 4 USB 2.0 connectors, an HDMI port, and a 10/100 RJ45 Ethernet socket.

All of the extra USB ports means that this can take several peripherals, including wireless adapter and keyboard.  The Pi 3 includes a built in wireless adapter, but the Pi 2 does not.  If you are getting a Pi for your lab, it is probably best to pick up whatever the latest model is, ignoring my setup.  The Pi 3 came out a few weeks after my last attempt at the Re4son project.  The frustration over the poor timing of its release, after dropping money on all new case, screen, and so on is one reason I haven’t touched it in a while.

Once again, if you want to follow along in building a lab similar to mine, here are the components.

The Pi 2 Board I recommend getting whatever is newest, though.

USB to TTL Serial Cable – Debug / Console Cable for Raspberry Pi Just like with the BeagleBone Black, you will probably want to be able to hit the “console” sometimes. This cable is needed for that. Note that the voltage on this is different from the one for the BeagleBone Black. Don’t use the wrong cable with either board.

The Case This case is really nice even when not used with one of the screens. It’s fairly sturdy, and fits around the components snugly. If you are not getting a display, there are other cases that are just as nice, and don’t cost as much. Shop around.

The 3.5″ TFT Display Unless you are planning on doing a specific project that includes such a tiny screen, I recommend holding out for a larger one, instead.  Something like this might be better, but it’s pricey.

Samsung EVO 32GB Class 10 Micro SDHC Card These came on sale for ridiculously low prices a few times, so we got them in sets of three or more. Class 10 cards are highly recommended for use with these small Single Board Computing devices.

SSH Start to Finish – Certificate Authority Basics

The way the OpenSSH Certificate Authority works depends on a few components.  First, there needs to be one trusted signing authority.  This can be any system, and it does NOT have to actively be connected to the network for the client/server handshake to take place using the CA signed keys.  There should also be a Key Revocation List, as well as a means for keeping the KRL updated.  A proper Identity and Access Management (IAM) platform could possibly handle this.  A close second would be a proper Configuration Management / Server Automation tool such as Puppet, Chef, Salt, or Ansible.  We will not cover using either of these tools in this series, but we will (most likely) cover an alternative solution when neither of the prior recommendations is available.  That’s for another day, though.  Today, we’re only going to introduce the basic concepts and fundamentals of how the OpenSSH Certificate Authority works.

Let’s set up the players.  There is a person (User_A) that needs to log into a target machine (Server_A) as himself.  He is coming from his laptop (Workstation_A.)  Normally, User_A would generate his key pair, log into Server_A as himself, and place the public key into the authorized_keys file in his home directory.  Instead, we’re going to pull in a new player that acts as a trusted third party.  This will be the Certificate Authority (CA.)  The CA should be run by a non privileged user on a server that is either not directly connected to the network, or is heavily protected.  The actual privilege of signing should also be restricted to a small team of people with a job role title that allows for this type of provisioning.  For our example, we will assume it is network isolated.

We are assuming the CA is already set up, but here are the steps that should have been taken to do so.  Create the non privileged user (and group) for signing.  Switch to that user and create the CA signing directory structure(s.)  Use ssh-keygen to create the certificate signing key(s.)

There are two types of certificates that can be signed.  The user certificate authenticates users to servers.  The host certificate authenticates hosts to users.  Why do we need both?

A host certificate gives us the ability to stand up a new server in our environment, sign its host keys with the certificate authority, and then the client knows that the new key is okay without prompting the user to trust the key first.  This reduces some of the issues with managing the known_hosts file.

A user certificate gives us the ability to tell the server that our key is okay without having to place the key on the server first.  This removes some of the issues with managing key distribution.

A signed user certificate can place restrictions on the signed public key, including all of the restrictions we discussed with the pre-amble section to the authorized_keys entries.

Let’s look at the broad overview work flow for today.  Next week, we will cover the commands needed to stand up that certificate authority structure listed above, plus the commands to sign both host and user certificates.

Work flow scenario: a new machine is built.  The host keys are regenerated (if for example this is a cloned virtual machine) and signed by the Certificate Authority.  This signed certificate is placed back onto the new machine, and that’s all that is needed, as long as the clients are configured correctly.  For the client to take advantage of this, the client needs a special known_hosts entry that begins with @cert-authority and is followed by the public key for the signed host certificates.  When the user goes to log into the new machine, the connection flow will include the server presenting a host certificate to the client, who then checks that the known_hosts “@cert-authority” entry can decipher the host certificate, and the connection is then accepted on success.  This helps prevent confusion on intentionally newly built systems when IP or hostnames change regularly.

Work flow scenario: a new user needs access to a system.  The user generates their key, sends the public key to be signed, and when the certificate is received, places it in their .ssh directory with the rest of the key related files.  The host machines have already been configured to trust the certificate authority in the sshd_config file.  When the user goes to connect with ssh, the client presents the signed certificate to the target machine.  The target machine’s sshd opens the TrustedUserCAKeys entry to open the appropriate public key to decode the certificate.  If this is successfully decoded, the connection is trusted as if the key were in authorized_keys for that user.  This helps reduce the heavy work load of managing multiple authorized_keys files per user.

Of course, there is more to it than this, but we’ll go into the finer details over the next few weeks.  Next week will be an explanation of the commands needed to set up the CA, (including revocation lists, and why they are important.)

Thanks for reading!

Fun-Day Friday – Wildcraft Board Game

Before we get to the meat of today’s post, I wanted to let you all know that yesterday my email subscribers received the first weekly email only content. It’s something that was sent directly via my list provider, and is not on the website anywhere. If you aren’t subscribed, you might be missing out. Anyway… onward to today’s post!

Over the holiday season, our household received several new games as gifts. Among them, we got Mastermind (similar to battleship, but not really,) ION (card and dice game,) Settlers of Catan (board game,) and a few video games for the kids. I received the elusive NES Classic gaming console I lamented not being able to purchase on launch day, as well.

All of these games gave me the idea that I should cover some of our collection of physical games (board, card, and dice,) over the next several Fridays. Instead of starting with the ones we received THIS year, I thought I’d start with one that is probably a lot less known. I have a thing for “underdogs,” and this game kind of fits that bill.

Wildcraft! Board View

The game is called “Wildcraft!” and is a cooperative board game. It is designed for 2 to 4 players. Each player uses a token like the ones in the game “Sorry!” to represent their progress along the board path. There are also black and blue coin shaped tokens that are used to represent the “passing of the sun” and “baskets of huckleberries” respectively.

Three decks of cards are used. One deck contains various plants. One deck contains various “trouble” cards. One deck contains a stack of “cooperation” cards. A spinner with 6 possible outcomes is included.

The premise is to leave Grandma’s house, travel the spiraling path up the hill to the huckleberry patch, gather two baskets of huckleberries per player, then return back down the path to Grandma’s house before the sun sets. The path has a couple of spots that let you jump gaps bi-directionally, and a couple that let you jump gaps in one direction only. Each spot on the path represents either a “rest” area, a “moon,” a “trouble spot,” a “harvest spot,” or a “cooperation spot.” Across one side of the board are sections showing the sun passing across the sky.

If you land on a “moon,” you place a black token on the next free “sun movement” spot. This is the only antagonist in the game. If all of those sun progress spots are filled up before the last player makes it back to Grandma’s house, everyone loses. The more players there are, the longer a game takes, but the more likely the team is to lose, as well.

If you land on a “cooperation” block, (represented by a rainbow,) you draw a cooperation card. This card can either be used immediately to pull the person furthest behind up to your position, or it can be saved to aid another player later.

If you land on a “trouble” block, you draw a trouble card. This could be something as simple as just being “Hungry” or it could be that you got poison ivy, for example. The trouble card does nothing to hinder your progress, but “fixing” an ailment lets you move to the next rest spot, so there is incentive to do so.

If you land on a “harvest” block, you draw a plant card. These are the cards that help you fix the ailments from trouble cards. If you have an ailment, and a plant card that fixes it, you discard both, move to the next rest spot available, and end your turn.

Rest blocks do nothing.

The “1” on the spinner also has a rainbow. If you spin a “1” you draw a cooperation card, and the rules for this are the same as if you land on a rainbow spot on the board.

Once a player reaches the berry patch, they stop spinning on their turn, and instead collect huckleberry bucket tokens. After the correct number of berry buckets are gathered (2 per player overall, so 4 if there are 2 players, 8 if there are 4,) the player spins and begins working their way back down the hill. If a player passes someone on their way UP the hill, that player is now able to turn around and start back down.

Wildcraft! - Kids Playing
Wildcraft! – Kids Playing

This game is educational and a TON of fun. Game play can take anywhere from about an hour to several hours, depending on number of players and how many times people hit the “short cuts” in the wrong direction. It’s great for an afternoon of quality time with friends and family.

The game can be found HERE.

They have a Twitter and Facebook page, if you want to check out their feed.

The Lab – Gear Check – The BeagleBone Black

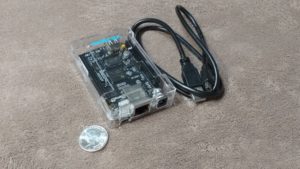
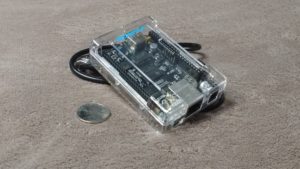
We’re taking a break from the “Hacker-Tool Hump Day” posts to cover some of the gear being used in the Security Lab. There aren’t too many physical pieces, since a hypervisor for virtual machines is involved, but there are a few.

BeagleBone Black
BeagleBone Black

Today, we’ll take a look at the BeagleBone Black. Many people are familiar with the single board computers (SBC) that have sprung up over the last few years. The Raspberry Pi series had much to do with this, and we will definitely cover it, but I wanted to cover one of the underdogs, first.

The BeagleBone Black is currently at revision “C,” and this is the version I own. The great thing about the BeagleBone Black is that it includes an eMMC chip for on board memory storage, and this is where the built in OS lives. Revision “C” comes with a 4GB eMMC, and is pre-installed with Debian Wheezy. Plugging the board into a USB port on your computer using a USB-mini cable will both power the board and provide a USB ethernet connection to the board. The new virtual interface should get the IP address 192.168.7.1, and the board’s IP should be 192.168.7.2 so that you can log into it. The root account has an empty password by default.

This board includes a power jack for an external power brick so that power hungry accessories won’t draw too much load. It offers a single standard USB port for USB host support, a micro HDMI port for external display. A microSD slot allows for installation of other operating systems without overwriting the eMMC OS, which makes it somewhat versatile. OpenBSD can be installed on this device, which is one of the reasons I wanted to pick this up, but it is still a somewhat new port, so some functionality may be limited. The JTAG port works well to get a serial console into the system, as well. There is also a standard RJ45 jack for a 10/100 ethernet connection.

The processor is a 1GHz, 2000 MIPS Sitara from Texas Instruments. It has more than enough umph for the light workloads we’ll be using in the Lab.

Expansion boards that utilize the GPIO pins are called “capes” in the Beagle Board community. I link to one of these at the bottom of this article. There are other boards offered, and some of them are a lot more powerful and a lot more expensive. The BeagleBoard X15 was just recently released, for example, and costs around $230 to $250, but it has on board gigabit ethernet plus quite a few other peripheral options. I might drop some coin on one for the lab later, especially if OpenBSD brings it into the fold of supported hardware. Until then, the BeagleBone Black is more than sufficient for the kind of testing we’ll be doing.

If you are looking to get into, or try to expand your knowledge of penetration testing techniques, there is also an excellent book on using a handful of these boards specifically for that purpose. Dr. Phil Polstra

BeagleBone Black

Here’s the run down on the bare essentials for this board, and where to get them. Don’t worry, guys. While I definitely would include an affiliate link to help fund this project, Amazon won’t allow Arkansas residents to participate in their A-Store program, so all links are non-affiliate, (even the non-Amazon ones.)

The Board This contains the board, a case, a power supply, and a USB cable for use with the miniUSB client port near the RJ45 jack.

GearMo USB to 3.3v TTL Header like FTDI TTL-232R-3V3 Note that this cable is a 3.3V cable. The Raspberry PI uses a 5V cable. Be careful that you use the correct cable with the correct device if you mix and match like I did.

Samsung EVO 32GB Class 10 Micro SDHC Card These came on sale for ridiculously low prices a few times, so we got them in sets of three or more. Class 10 cards are highly recommended for use with these small Single Board Computing devices. While not necessary with the BeagleBone, it is nice to have options (like OpenBSD) as well as some external storage.

Hacking and Penetration Testing with Low Power Devices The book by Dr Phil Polstra.

Book and Cape bundle I hit up Dr Phil about this a little late, so I’m not sure if this is still valid or not. You might want to contact him on Twitter to verify before pulling the trigger on this, but I included it in case it still works.

EDIT: I got a response from Dr Phil after this post went live.

Sorry, I just got this message. Yes, I do still sell the kits. I have been selling the kits separate from the book mostly because Syngress won’t offer any discounts on my own book unless I buy 50 at a time so people are better off with Amazon etc. Part of the reason I now publish with Pentester Academy.

Welcome to 2017

Happy New Year.  I hope your holiday season was pleasant, and full of family, food, and fun.  Ours was.  The kids are all settling down about now from all of the excitement, and we’re happy to all be together.

Last year was mostly an experiment to see how this site might work.  This year is knuckle down time, and I’m hitting the ground running.

The site has had a few changes since last year.  I’ve added some new pages, changed the “Recent Posts” link on the right to include the RSS feed link, and categorized things to make them easier to find moving forward.  Next Monday will continue the SSH series, picking up where we left off with an introduction to the OpenSSH Certificate Authority.

I will start including a survey every now and then to help me decide on what content to cover next, as well as including some extra content in a news letter format for those folks that have signed up for my mailing list.  I’ve left the site RSS feed attached to the mailing list for now, but may change that later.  If I do, it’ll be two lists, and people will have the opportunity to adjust their mailing list options to set what feeds they care for most.

I’m going to also be active on three social media platforms.  I will probably be primarily active on Twitter, but starting this year, I will be at least sharing my blog content on FaceBook and LinkedIn, as well.  Note that there is now a link in the menu on the right, as well as at the bottom of the page for each of these platforms. If you’re on one of those platforms and would like to follow me there, I’d love to have you.

Going live again in January.

I’ve been working hard to get the pages that are missing added, some existing pages updated, and some new content ready for go-live at the beginning of next year.  First post of the new year will be Monday, and will be an explanation of how things will work moving forward.  All new pages will go live around the same time.

Thank you for your patience while I got things in order, and took a break for the holiday season, as well.  Things should be better moving forward, and I’m ready to hit the ground running in the coming year.

Also, the DSH beta should be ready to go by middle of January.  Be looking for it.

Thanks again to everyone who stuck with me on this.

UnixSecLab

Hiatus Hump-Day – What

Today would normally be “Hacker-Tool Hump Day,” but I’ve decided I need a hiatus. I know this is sudden notice, but I’ve had no engagement since I started this blog. The only comments I’ve received have been spam, except possibly one, but that one doesn’t make sense in any context. The commenter has an AOL address, and listed his website as “Bing” in the U.K. If that’s you, and you honestly meant for me to respond to you, please comment on THIS post, not one that’s weeks old, and I might get back to you.

Zero engagement equals higher apathy, and with all that’s going on in the household at the moment, a break is warranted. Will I return? Absolutely. Sooner, if people read this and tell me to come back.

When I return, here’s what can be expected of this site:

1) There will be a working asciinema demonstration for each topic I cover that warrants it.
2) I will possibly go back and re-work prior posts to be re-posted with the above said asciinema recordings to bring clarity to my content.
3) I will untie the blog posts from the standard “sign up for my email list” form, and make the list be for special content and/or promotional offers.
4) What was that about promotional offers? Yeah. About that. I’ve got a product I’ve been working on for a while now that I need to re-focus on polishing up and posting as an available download for purchase. I’ll go ahead and mention that the topic is “Dancer’s Shell/Distributed Shell” which is an open source program for sending ssh remote commands to multiple end point servers. Most of the tutorials I have seen have put a focus on thing like working with nodes in a cluster. My focus is more about developing your own set of tools to manage systems in general. When it launches, this product will be in “Beta” for a limited number of customers. Those customers will get free updates to that product through “final copy” launch, and get a chance to purchase at a reduced price. The initial price for the beta will be in the $7 range. Based on feedback, this will only go up, not down, when it goes live.
5) I will also work on a product to help people go through the thought process for developing their own managed OpenSSH public key infrastructure, whether it uses the certificate authority, or not. It should help people to choose what will be most manageable for their needs, and cover the pros and cons of any given set up, including security risks.
6) I will also work on a product to help people take advantage of the power of TMUX, which is everything Screen should have been, but wasn’t. Just my opinion, of course. What order I develop these next two products (TMUX vs. Managed OpenSSH PKI) will depend on feedback from you, my readers.
7) I am going to go back to the basics, and re-vamp this site. It’s missing a few things that should be there and aren’t. I need to get an “About Me” page, start taking advantage of categories so content can be easily grouped together, and so on.

If you have been around, but haven’t commented and are now sad that I’m taking a break, you can comment and let me know that there are people out there that don’t beep and boop about how much their product can help me improve my blog. I don’t want or need the spam, but I would LOVE to get responses from real people who appreciate the content I’ve provided.

If you have topics you wish I would cover that I haven’t, comment as well. I have a list of stuff to cover, but feedback lets me know if I’m on the right track, or leaving you frustrated for not covering that one thing you really need to see.

So for now and until I get things un-cluttered and un-broken, thanks for the few I know have been reading, and thanks to those I might not know, either.

UnixSecLab