Pi-Top Kali – Getting Kali Installed

Over the last few weeks, I’ve gone through the process of installing Kali onto its own microSD card for use on the pi-top.  I started with the latest 2017 image, but recently the first 2018 image became available, so I did the procedure again.  This document will cover the latest image.

First, I downloaded the image from the site onto my Linux Mint laptop.  Next, I verified the checksum.

sha256sum ./kali-linux-2018.1-rpi3-nexmon.img.xz
1ce9fb1ab69c709046b3ddddfeff6481b484f19e8b2b61725cebfb6361953c08  ./kali-linux-2018.1-rpi3-nexmon.img.xz

This matched the checksum on the site.  After verification, I unpacked the xz archive with unxz.  This created the kali-linux-2018.1-rpi3-nexmon.img image file for installation.

unxz kali-linux-2018.1-rpi3-nexmon.img.xz

Next, I put a new 32G microSD card in to receive the image.  I checked dmesg output to verify that the card was recognized successfully.

[11115.585761] mmc0: new ultra high speed SDR50 SDHC card at address 0001
[11115.603234] mmcblk0: mmc0:0001 00000 29.8 GiB
[11115.606945]  mmcblk0: p1

In order to install, I unmounted the auto-mounted card and used dd to tranfer a copy of the image to the card.

sudo dd if=./kali-linux-2018.1-rpi3-nexmon.img of=/dev/mmcblk0 bs=512k
14000+0 records in
14000+0 records out
7340032000 bytes (7.3 GB, 6.8 GiB) copied, 388.375 s, 18.9 MB/s

I ejected and re-inserted the card to verify it is seen correctly.  Both partitions were picked up, and I unmounted these for the next step.  Because the image is much smaller than the size of the card, I needed to resize the linux partition to take advantage of the extra space.  I used GParted for this.

GParted has an issue with the e2fsck not being up to date enough.  I had to install the following two packages manually, before growing the EXT4 mount point:

sudo apt-get install ./e2fsprogs_1.43.8-1ubuntu1_amd64.deb ./e2fslibs_1.43.8-1ubuntu1_amd64.deb

Once GParted was working correctly, I used it to resize the linux partiton.

sudo gparted /dev/mmcblk0

I selected the EXT4 mount, chose “move/resize,” and resized it to take up all of the unallocated space.  I then applied the change, and closed the program.

I swapped microSD cards to put Kali into the pi-top and remove polarisOS.  Booting the machine worked fine on first try, so the image appears to be installed okay.

I had a few housekeeping tasks to take care of.

My first housekeeping task was to create a new password for the root user.  Second was to regenerate host keys.  Most pre-built images should go through these two basic steps, since they ship with pre-generated widely known shared keys and passwords.

To regenerate the host keys, I ran:
root@kali:~ rm /etc/ssh/ssh_host_*
root@kali:~ dpkg-reconfigure openssh-server
root@kali:~ service ssh restart

I was surprised to find that the newest version of kali actually didn’t ship with pre-installed ssh host keys.  When I ran the rm command, it failed with file not found, and a file listing of /etc/ssh confirmed there were none to remove.  I only needed the dpkg-reconfigure and service restart.

My next steps included updating the system, since Kali-Rolling updates very frequently.  In order to do this, I put the machine on the network, then ran the following:

ntpdate 0.us.pool.ntp.org
apt-get update
apt-get upgrade

The reason for the ntpdate first is that the machine doesn’t come with a configured NTP service, and the clock on the Pi puts the machine several months behind the real world.  It thought it was December 14 rather than current date.  The other two commands updated the APT cache, and then updated the system to latest.

My final task was to go through the process of updating the repository lists to be able to install the “pt-*” packages from polarisOS, but I ran into a dependency error on one of the packages, which prevented that from working properly.  I’ll continue to troubleshoot this issue before I go into the deep details of setting it up, but the error I ran into was that the python3-pt-idletime package was dependent upon python3 (< 3.6) where 3.6.4 is the current version in Kali.
Pi-Top Kali – First Boot PolarisOS

Last week we talked about the kit, how it went together, and the fact that the first boot was to the pi-top polarisOS microSD card included with the kit.  Today, I’ll go over a quick rambling of notes on how the second “First Boot” (after it charged) went, and what I poked around looking for in this OS.  This post will not include screenshots, but I may try to get a few and do a follow up later in the week that is screenshot heavy.

It is a graphical boot that brings up a LightDM Panel (auto log-in.)  This initial Panel is the “pi-topDASHBOARD” and contains the following three sections:

  • Learn. Play. Create (includes "pi-topCODER" launch and "CEEDuniverse" play buttons)
  • Quick Launch (includes application icons for common/popular applications.)
  • Notes (a notepad that can be typed into.)

Along the top of the Panel is a status bar that includes indicators for whether the network is working, battery status, date/time, and a selector for Settings.

Selecting any app from the Quick Launch (or pressing the “Panel” keyboard button) will make this initial panel go away, and present the typical X11 style desktop.

Pressing the “Panel” keyboard button will bring the panel view back.

Since the Battery Status only shows on the Panel bar, this is a good thing to have.

From the typical X11 style desktop view, there are a few apps pinned to the bottom task bar.

  • Chromium
  • File Manager (PCManFM)
  • LXTerminal
  • CEED Universe
  • 3D Slash
  • Mathematica
  • Wolfram

The far right of the status bar includes status icons for the network, volume, and time, as well as an “eject” icon for external media, and a “panel” icon that can be clicked instead of hitting the Panel button on the keyboard.

The primary menu icon is in the lower left corner and the menu includes categories for:

Out of the packages listed above, htop is a “top” replacement that has some enhanced features, CEED Universe is part of the pi-top “CEED” learning software, with online games and such, and the rest are pretty self explanatory (integrated development environments, programming languages, some games, web and email, and an office suite.)

The items of greatest interest to me from poking around with the intent of setting up Kali as the primary OS for this machine are the hardware related packages.  I want a battery status indicator, as well as power/terminal launch/panel control buttons to function from the keyboard.  In order to take advantage of these things, I took a look at the software repository settings, and found this:

/etc/apt/sources.list:

deb http://mirrordirector.raspbian.org/raspbian/ jessie main contrib non-free rpi
# Uncomment line below then 'apt-get update' to enable 'apt-get source'
#deb-src http://archive.raspbian.org/raspbian/ jessie main contrib non-free rpi

/etc/apt/sources.list.d/pi-top.list:

deb http://apt.pi-top.com/raspbian/ jessie main

/etc/apt/sources.list.d/raspbian.list:

deb http://archive.raspberrypi.org/debian/ jessie main ui
# Uncomment line below then 'apt-get update' to enable 'apt-get source'
#deb-src http://archive.raspberrypi.org/debian/ jessie main ui

All of the packages specifically for the pi-top hardware include a “pt-” prefix.  Using a mix of dpkg -S, dpkg -L, and apt-cache showpkg I was able to confirm that the pt-* packages are located at the raspbian repositories jessie main.  This should make it easy to install them for Kali to take advantage of the special keyboard keys, and maybe get a battery status indicator.

Pi-Top Kali – The Kit

Last week was all about the order and tracking.  Today will cover the unboxing, how the kit goes together, and some potential “gotchas” to watch for while putting your own kit together, if you’re following along.

The large shipping box contained two boxes.  The larger box had the shell/kit, and the smaller box held the Raspberry Pi 3.

pi-top case
Pi-Top Case

I opened the larger box first, and verified that the contents were okay.  Inside were the shell, a box containing the charging cable + plug adapters, some booklets on the pi-top itself as well as the inventor’s kit, and of course, a box containing the components to the inventor’s kit that came with the purchase.  I don’t plan to do anything with the inventor’s kit for a while, so I left that alone.

The first step in putting the kit together was to slide the keyboard panel down, then remove the screw holding the heat sink/GPIO bridge in place.

GPIO bridge + heat sink

After that piece was removed, four screws were removed to take out the plastic card “stand in” for the Raspberry Pi 3.  This card has a little cushion on one side that helped protect the heat sink/GPIO bridge during shipping.  Once those were removed, I slid the hub to the right along its rail.

The next step was to unbox the Raspberry Pi 3 so that it could be installed.  What I did not do at first, but I recommend be done if you intend to use it at all, is to install the microSD card that came with a pre-installed pi-top polarisOS image.  Not installing the card before installing the Pi isn’t a deal breaker, but if you’re not going to swap cards, it’s less of a pain to do it now, rather than later.  If you do intend to swap cards, or you forget to install it before installing the Pi into the case, the little tool they include includes a groove for pulling/guiding the card into and out of the Pi.

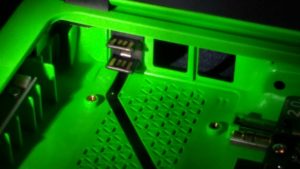
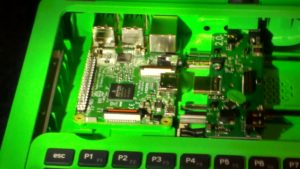
To install the Pi, I had to line up the two USB prongs inside the case with the left most set of USB sockets on the Pi, then gently push up (toward the back of the case) to seat the board.  The next step was to put the screws back in to hold the Pi in place.  The holes in the Pi didn’t quite line up right with the holes for the screws, so a little effort may be needed in getting the Pi seated properly while installing these screws.

USB bridge
USB bridge
Pi Seated onto USB bridge

Once the screws were in place, I had to carefully slide the hub such that the audio plug and the HDMI plug slid into their respective sockets on the Pi.

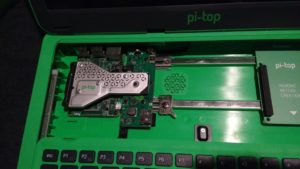
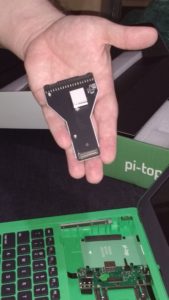
Finally, I lined the heat sink/GPIO bridge up with the GPIO pins on the Pi, and carefully seated it until the pins on the other side seated into the smaller groove on the hub.  Once it was snugly in place, I installed the last (longest) screw to keep it seated.

Pi Installed
Pi Installed

With all of the components in play, and the microSD card installed, the last step was to slide the keyboard back into place and turn the machine on.  My first boot was to the pi-top polarisOS they included with the device, so that I could check that everything worked okay with their included software.

I noted that the battery indicator within polarisOS showed a 33% battery status, so I shut it back down and plugged it in.  It took a few hours to charge to full.  While charging the indicator light next to the USB ports on the back flashes.  When it is finished, it turns solid green.

Next week will cover the first boot, general poking around, and discovery of tools within polarisOS.

Pi-Top Kali – The Purchase

In the last update on this project, I went over the thought process that led to my decision to purchase the pi-top 2 kit.  Today, I’ll cover how the purchase, order tracking, and shipping tracking went.

I went to the site to place my order, since the AdaFruit reseller didn’t have this style available, yet.  The order itself was mostly straight forward, but the site had a few issues.  I chose to place the purchase as a “guest” because I didn’t see any need in creating an account with them.  My intent was to purchase this device, and then I had no reason to return.  There are only a few “modules” or add ons available through their site, and none of them really appealed to me, so this should have been a one and done deal.  I put in my credit card information, and then had to fill out some profile information such as name, address, and so on.

The first problem I ran into was the phone number field.  It was a required field, but no matter how I plugged in my phone number, it said “this number must be a valid international number,” (paraphrasing.)  There was a little flag icon next to the phone number field, but clicking it didn’t do anything.  It finally let me put in a number that was just 7 digits long, which I knew wasn’t correct, but didn’t care since the rest of the information was correct, and it wasn’t my intent to have to come back to the site after this purchase.

The purchase went through, and I got an order number.  I checked my email, and indeed, I had an order confirmation email, as well.  While reading the order confirmation, I ran across this statement:

Any inquiries about your order? Have any other questions for us? Visit our support page or contact us at support@pi-top.com, quoting your order number.

I read the support page link, and it stated that I would need an account if I wanted order tracking.  This was not mentioned during the order process prior to placing my order as a guest.  The instructions indicated that I should create the account “with the same email address as I used to place my order.”  I did so.  The profile page was not filled in all the way, so I went in and included the same information… name, address, phone number, and so on.

This time, the phone number field’s “flag” let me select the United States to indicate my country of origin.  There is a separate drop down field (both on the order page, and on the profile page for the account I had just set up) that asks for your country.  It would have made much more sense if the phone number field had keyed off of that, instead of requiring the kludgey flag clickbox thing, but it is what it is.

The next problem I ran into is that the order number did not show on this new account page.  I waited until the next day in case the linking might take some time.  When I didn’t see order information the next day, (Friday) I sent an email to the support email listed in the order confirmation email I had received.  This created yet another account that I had to set a password on, and the person that responded took two or three hours to respond.  Their question was to ask for which email I had used to order the package.  I felt this was an odd request, since I had used that same email to open my support request, but I sent a response within a minute of receiving this update, and waited.

I got no response the rest of that day.  I used the ticket system page itself to provide one more update as a “just in case my email reply didn’t go through” trigger, but still heard nothing over that weekend.  I just assumed that they were closed over weekends, and waited for Monday to roll back around in hopes of another update.

There were no status updates waiting for me Monday morning, so I sent another update request, since it should have been about noon U.K. time when I checked.  A couple of hours later, and I did get an update.  The update never did explain why the order status wasn’t showing on that account I set up, but it did include the tracking information, which is what I really wanted.  The package was already on a truck and out for delivery, so the shipping was very fast.

Based on my experiences, I can recommend that others create an account BEFORE purchasing, and be signed in DURING purchase of the kit.  I can’t guarantee that this will get you order tracking, but it has a better chance of it than the route I took.  All in all, the support experience wasn’t “great” but it was fast delivery (Ordered Thursday evening/Received Monday Afternoon,) and they did get me the tracking information before it was delivered.  Would I recommend this purchase?  So far, yes.

Pi-Top Kali – The Idea

As recently mentioned, I’ve been working on a few projects of late.  In preparation for an OpenSSH based class I might offer, I found myself wanting to offer a shorter class on OpenBSD’s VMM/VMD virtual machine hypervisor system.  In researching this VMM/VMD system, one of my tests involved booting a linux live disk.  I chose Kali for this.  Getting it to boot wasn’t straight forward, due to the lack of a graphics KVM style console.  The VMM/VMD hypervisor uses serial connections to the guest operating systems, so I had to find all of the bells and whistles to pass to the Kali boot loader to make it boot to a usable login prompt.

Secondary to the above, and partially why Kali was chosen, is the fact that my GCIH is half its lifetime old.  It’s a 4 year certification, and I’ve had it for 2 years, now.  I got a reminder that renewal is coming up, and I began the refresher research on what’s involved in keeping this certification maintained through the renewal process.  One option is to take another SANS course, and get a new certificate from it.  While I would love to do this at some point, their courses are very expensive.  I also have an itch to try a different certification provider, and one of those stands out above the rest, to me.  I’ve decided I will likely go for the PWK (Pentesting With Kali) class from Offensive Security, and take the OSCP (Offensive Security Certified Professional) exam and certification.  This certification has “teeth” in that you don’t memorize a question/answer pool in order to answer a bunch of questions that are similar, but not exactly the same.  Instead, they give you about 48 hours (2 days) for the total exam.  The first day is to do an actual penetration test of a 5 machine environment, and the second day is to give you time to do a professional quality write up/report of the pentest as if you were presenting the report to a client.  The cost is within reason, and my family supports me in this endeavor.  To that end, Kali is on my radar as a “use this frequently” system this year.

I have several options for running Kali moving forward, and I will cover many of them as I go on this journey.  I will eventually go over running it in virtual machine environments up to and including VMware Workstation, Oracle VirtualBox, as a ProxMox guest, and of course, through the serial console as an OpenBSD VMM/VMD guest.  I may or may not get around to covering running it as a live bootable USB stick, or as a physical install to a typical x86_64 laptop.  All of these are things I’m looking at, but the first thing I’ll cover is installation and use on a Raspberry Pi.

I’ve made a few attempts at using Kali on a Raspberry Pi before.  I had trouble getting the TFT displays working satisfactorily, and I benched those projects due to the level of hassle and my own time constraints.  I knew that when I circled back around to this idea, I’d want a bigger screen than either of those TFT displays offered.  I want the device to be portable enough that I can take it almost anywhere and set up shop, but I need a display that gives me enough work space to actually … work.

The smallest display I was willing to look at was the 7 inch displays available, but my wife has a 7 inch tablet, and it’s only a little larger than a modern day smart phone.  My latest failed Kali attempt was on my own tablet, where Kali Nethunter never seemed to get installed properly no matter how many times I went through the process.  I like this screen size, and there are a few 10 inch displays available.  I almost settled on a device that used one of these when I discovered that there is actually a kit that turns a Raspberry Pi into a laptop form factor.

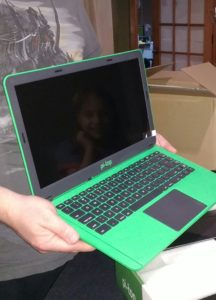
The two versions of the kit available on AdaFruit are the first version of this product.  One is green, and one is grey, but the kit itself is otherwise the same.  The project site has an updated “pi-top 2” design, which moves the trackpad down below the keyboard, and gives room for the keyboard to be full size, which works better for me.  I never liked trackpads in general, because I tend to brush the thing while I’m typing, but I’m sure I’ll work around this limitation somehow.  This case is also green, with no grey option available.  I would prefer grey, but I can live with the green case as long as it is as functional as I hope it will be.

After all of the research I’ve done, I have decided on the pi-top as my next Kali attempt.  I’ve made the purchase for the pi-top 2 style case, and will cover the experience of how the order/tracking went, unboxing, setting it up, running the pi-top polarisOS that comes with it, and getting Kali installed and running on the new machine.

The order arrived today, but the write up for that will be next week.

The Lab – Status and Happenings

I don’t really have a Gear Check post to share today, but I did want to give a status update on some of The Lab projects.

The new Hak5 Bash Bunny is on schedule on time to be delivered by end of day today (Wednesday.)  I already have some payload ideas I want to try, but I need to get it in hand and see how it handles flipping between attack modes before I get too attached to any one idea.  I’ll definitely post about it as a Gear Check next week.

The Beaglebone Black Wireless is still bricked at this point, but I should find time to unbrick it before the weekend gets here.  Once I do, I’ll update the OS, then I’ll try compiling GnuPG2 by hand.  We’ll try the Yubikey 4 from it again if that’s successful.  If it isn’t, I’ll plan to update on a different machine.

In the non-tech side of the shop, I’ve been engaged for a Permaculture design by a friend of a friend, and I’ve also been asked to hold a class / workshop on an introduction to Permaculture for a local Community Group for the Spring.  This might slow down some of The Lab technical work, but the primary focus will still be Unix Security.

Friday will probably be a Permaculture related post, simply because I’m working on the design stuff and it’s on my mind.

The Lab – Gear Check – Of Bunnies and Yubikeys

At some point today, Hak5 is rumored to be releasing their newest gizmo.  This device is the Bash Bunny, and that’s about all I know about it, but I’m eagerly anticipating discovering what I can about it.  It’s some kind of USB based attack device.  Some have speculated that it’s a USB Rubber Ducky on steroids, and others have speculated it might be similar to a Raspberry Pi Zero with case and special hardware.  We’ll just have to check throughout the day and hope it’s something in the Lab Budget range.

Monday, I posted the broad overview of how the GnuPG gpg-agent based ssh set up on the Yubikey should probably somewhat go.  Tuesday, I had the opportunity to look at the other piece that caught my eye.  The “PIV SmartCard” functionality mentioned means downloading and compiling a single tool from Yubico called the yubikey-piv-tool.

I was actually able to install a couple of prerequisite packages, compile the tool, and use it to configure the PIV SmartCard authentication slot today, and testing worked like a charm.  My only beef with this method is that the PIV standards don’t call for a key size greater than 2048 bits.  I prefer the 4096 bit rsa key for SSH, but 2048 is my bare minimum, and that’s available.

I literally followed this already written excellent guide, and it just worked.

Using ssh-keygen -fl on the public key pulled from that ${OPENSC_LIBS}/opensc-pkcs11.so path showed a 2048 bit rsa key without having to pass any extra flags to try to adjust bit size.

In case that guide changes, here are the steps:

Install OpenSC as a package if available.

Download and compile (./config && make && sudo make install) the yubikey-piv-tool from here.

yubico-piv-tool -s 9a -a generate -o public.pem
yubico-piv-tool -a verify-pin -a selfsign-certificate -s 9a -S "/CN=SSH key/" -i public.pem -o cert.pem
yubico-piv-tool -a import-certificate -s 9a -i cert.pem
export OPENSC_LIBS=/usr/lib/x86_64-linux-gnu/lib
ssh-keygen -D ${OPENSC_LIBS}/opensc-pkcs11.so -e

To use this, you need to call that ${OPENSC_LIBS}/opensc-pkcs11.so file as if it is your private key.  You can either use the -I flag for ssh, or use the -s flag for ssh-add to load this.  As long as the yubikey is plugged in when you try to load the key, it’ll work.

Please note that the default PIN is 123456.  They don’t tell you that in the guide, but that’s the default.  You probably want to change this PIN at some point, if you’re following along.

I’m still hashing out the OpenPGP SmartCard using GnuPG gpg-agent.  It is far more complicated.  I’m hoping it does allow for larger keys, though.  We’ll find out when we get it Lab approved.

The Lab – Gear Check – Unbricking the Bricked BeagleBone Black Wireless

Unbricking the bricked BeagleBone Black Wireless was mostly painless.  I needed a power source.  I chose to use the USB/microUSB cable that came with it for communicating over the HOST USB port.  This is the port that lets you log in via 192.168.7.2 if you are using the stock debian install.

I also needed the USB TTL serial cable, so that I could watch the console for the boot/reboot process.  This wasn’t absolutely needed, but it was very useful.  I highly recommend that you use one if you need to do this procedure yourself.  I used “cu” to connect to the console like this:

cu -l ttyUSB0 -s 115200

The first step was to download the correct recovery image.  I navigated from beagleboard.org to find it based on the board I had on hand.  I started at the troubleshooting page and worked my way to the latest images link to grab the image I needed.

Once I downloaded the .img.xz file, I ran unxz to unpack it, then copied it to the microSD card via the SD card adapter:

unxz bone-debian-8.6-lxqt-4gb-armhf-2016-11-06-4gb.img.xz
sudo dd if=./bone-debian-8.6-lxqt-4gb-armhf-2016-11-06-4gb.img of=/dev/mmcblk0

Once this was done, I put the microSD card into the BeagleBone Black Wireless, hooked up the TTL serial cable, connected to it with cu, and plugged in the other USB cable to power it on.  I had already booted the device while pressing the button that tells it to boot from microSD instead of eMMC, but if you are in this pickle and haven’t done that, make sure you do so now.

Over the console, I watched it boot until it gave a login prompt, and then I logged in as root (no password.)  Then I checked the flashing the eMMC page to get the instructions on what file to modify, and uncommented this line in the /boot/uEnv.txt file:

cmdline=init=/opt/scripts/tools/eMMC/init-eMMC-flasher-v3.sh

A reboot from there, and the console took a while to flash the eMMC, but once it was done, everything was working again.  I’ll do another write up on getting OpenBSD to work on either the wireless or the RevC in a later post.

The Lab – Gear Check – New Arrival (another Bone)

Last week, I obtained a new BeagleBone Black in the mail.  This is the newest revision of the device, and it replaces a few components for newer ones.  This is the BeagleBone Black Wireless.

Instead of the RJ45 ethernet jack, it has on board 802.11.  Instead of the miniUSB it has microUSB for the Host USB connection (the one that you plug in to get ethernet over USB with the 192.168.7.2 address.)

It also comes with a newer version of Debian.  Instead of Wheezy (7) you get Jessie (8.)  This means it comes with the dreaded systemd software, but that does give one box to bang around on with that monster installed.

Beyond that, this machine is much like the last, and as long as you can find a place to orient the antennas, you should be gold.

The price is higher, but the on board wifi might be worth it.  I certainly felt it was worth the purchase to try.  So far I haven’t been disappointed.

The same serial cable works for this board as for the Rev C board, so if you need one, use the link from the previous article.

The new board was available as a kit with case, microUSB cable (for the Host USB connection,) and pre-installed antennas for the wifi, plus a power brick (same as the old board) from the same folks that provided the last kit I listed.  Here’s the link for the new one.

I will likely do a demonstration of using the serial connection to install OpenBSD onto a microSD card for this machine at some point, assuming the wifi works with this board.  I want to play with it some to be sure before I commit to that, though.  If not, I’ll likely at least demonstrate on the old board, where I know it works.

Thanks for reading!

The Lab – Gear Check – The Proxmox Server

This week I’ll be brief.  No pictures to go with this, because the gear is hand me down desktop stuff, but I’ll share some resource links for the software.

One component of this lab is a virtual machine server that I use to spin up VMs for various things.  Mine is currently just an old Alienware desktop I got from my cousin when he was cleaning house a year or two ago.  It doesn’t have much, and the setup isn’t ideal, because it’s just one machine, not a cluster for high availability, but it works for a lab environment.

The host software I use is called “Proxmox” which is a debian based Linux distribution that borrows a kernel from RedHat land for some of the capabilities it offers.  It’s basically a pretty web based front end to KVM, built in.  The interface isn’t too far different from VMware’s VSphere interface, but that’s a simplified comparison, really.

A friend from my old place of employment introduced me to Proxmox, and while I was researching the software online, I came across a book on it.  If you already have a hypervisor available, great.  Use what you know.  However, if you’re looking for an easy to manage hypervisor, because workstation virtual environments like VirtualBox just aren’t cutting it any more, this is a good one to pick up.  I highly recommend it.  It does have a free version, and it will nag you about not having a subscription, but it’s a minor annoyance in my opinion.

The software can be found here.

The book I mentioned can be found here.

The second edition of that book (which I don’t own yet) is here.