The Lab – Gear Check – Hak5 Field Kit

I’ve talked about individual pieces that are in the field kit before, including the USB Rubber Ducky, and the LAN Turtle.  The Field Kit has both of those, plus lots more.

Hak5 Field Kit 1
Hak5 Field Kit 1

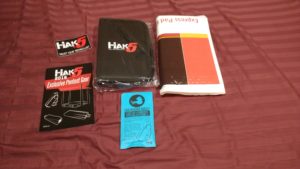
We’ll start with the stylish zippered case.  It has the “Hak5 TRUST YOUR TECHNOLUST” logo on the front.  There is also a key ring tag that says “REMOVE BEFORE FLIGHT” on one side and “TRUST YOUR TECHNOLUST” on the other.  I have this attached to the zipper for every day carry use.

Inside are several elastic straps sewn into each side and on the spine.  These are positioned to hold various items neatly in place.

Hak5 Field Kit 2
Hak5 Field Kit 2

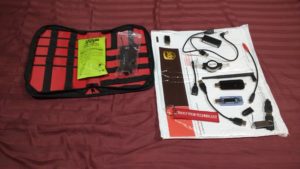
The kit includes a DVB-T+DAB+FM USB SDR radio receiver with magnetic mount antenna. I already owned two of these due to my HAM Radio hobby, so having an extra is nice.  This can be used in conjunction with GNU Radio (or other software) to receive and decode various signals and digital modes.

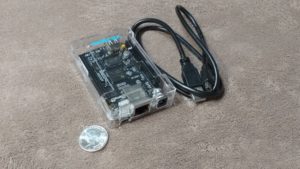
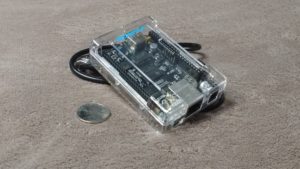
It includes a LAN Turtle and USB Rubber Ducky (with all Ducky accessories) which I also already had one of, so spares are nice.

There is a non turtle USB Ethernet Adapter, as well as a USB wireless adapter (with antenna.)  These help provide a little extra networking on the go, if needed.  They are especially useful in conjunction with a WiFi Pineapple (Nano or Tetra) which did not come with the kit I purchased, but is often an option that can be included.

There is also a USB multi meter for checking voltage/amp and other readings for a USB socket, as well as analyzing how much draw you are generating with your peripherals.  If you’re drawing too much, you’ll want to get a beefier power source for your gear, so it’s good to keep an eye on these things.

Finally, an assortment of cables and adapters for USB (including a micro USB to micro USB OTG cable, and self winding Ethernet cable) round out the mix.

I’ve added the battery pack from my WiFi Pineapple Nano to the kit, but the Nano itself stays in its own holster outside of the kit.  This way I don’t accidentally take it to work with me.

The kit normally cost around $170 when I bought it, but that kit is no longer available on the site, and I got it at discount when they ran the “Mr Robot” special for the USB Rubber Ducky cameo that aired on that show.

There are several kits available on the shop at this time, and this is the closest one to what I have, but it contains a lot more gear and is priced a bit higher because of it.  If you add up the cost of components bought separately, it’s still a good deal, and looks like it’s on sale today.  That may change in future.

Hak5 Elite Field Kit

It’s well worth the money if you can afford a kit and want some goodies for your lab.  If the link above is dead by the time you get to this, and I haven’t noticed and cleaned it up, here’s the link to their shop with all the various kits that should be available.

The Lab – Gear Check – The Raspberry Pi

Today, we’ll take a look at the Raspberry Pi.  The Raspberry Pi is currently at “Pi 3” but our lab has a Pi 2 model B, which is what we will cover.

Raspberry Pi 2
Raspberry Pi 2

The original plan for the Pi was to create a very small and portable attack device, using Kali linux as the OS installation.  I mused over what to do about a screen, when I came across another blog post that covered how to set this up with one of the little screens sold by AdaFruit.

Re4son’s blog post gave some initial instructions that I tried to follow, but they didn’t work for me at first.  I bought the smaller 2.8″ screen on accident, and the menu size didn’t match.  I tried mucking with those settings, but there were SO many menus that needed adjusting, that it just wasn’t worth my time.  I bought the bigger 3.5″ screen and tried again.  I had a little more success, but the last time I rolled with this, I had issues with the Greenbone setup for Open-VAS.  I think it was probably an issue with the version of Kali I was at at the time.  I shelved this project, and haven’t picked it back up.  I will probably give it a go again, because his blog post has evolved even more since I last followed it.

Now that I have the Nexus 10 with Nethunter on it, this specific project will be a lower priority for a while, though.  My use for this until then will focus on using this as one of the target machines, either for configuration management examples, or as an actual vulnerable machine (with configuration issues being the primary vulnerabilities.)

The Pi 2 has a quad core 900Mhz ARM Cortex-7 processor from Broadcom.  It includes 1 Gig of RAM, 4 USB 2.0 connectors, an HDMI port, and a 10/100 RJ45 Ethernet socket.

All of the extra USB ports means that this can take several peripherals, including wireless adapter and keyboard.  The Pi 3 includes a built in wireless adapter, but the Pi 2 does not.  If you are getting a Pi for your lab, it is probably best to pick up whatever the latest model is, ignoring my setup.  The Pi 3 came out a few weeks after my last attempt at the Re4son project.  The frustration over the poor timing of its release, after dropping money on all new case, screen, and so on is one reason I haven’t touched it in a while.

Once again, if you want to follow along in building a lab similar to mine, here are the components.

The Pi 2 Board I recommend getting whatever is newest, though.

USB to TTL Serial Cable – Debug / Console Cable for Raspberry Pi Just like with the BeagleBone Black, you will probably want to be able to hit the “console” sometimes. This cable is needed for that. Note that the voltage on this is different from the one for the BeagleBone Black. Don’t use the wrong cable with either board.

The Case This case is really nice even when not used with one of the screens. It’s fairly sturdy, and fits around the components snugly. If you are not getting a display, there are other cases that are just as nice, and don’t cost as much. Shop around.

The 3.5″ TFT Display Unless you are planning on doing a specific project that includes such a tiny screen, I recommend holding out for a larger one, instead.  Something like this might be better, but it’s pricey.

Samsung EVO 32GB Class 10 Micro SDHC Card These came on sale for ridiculously low prices a few times, so we got them in sets of three or more. Class 10 cards are highly recommended for use with these small Single Board Computing devices.

The Lab – Gear Check – The BeagleBone Black

We’re taking a break from the “Hacker-Tool Hump Day” posts to cover some of the gear being used in the Security Lab. There aren’t too many physical pieces, since a hypervisor for virtual machines is involved, but there are a few.

BeagleBone Black
BeagleBone Black

Today, we’ll take a look at the BeagleBone Black. Many people are familiar with the single board computers (SBC) that have sprung up over the last few years. The Raspberry Pi series had much to do with this, and we will definitely cover it, but I wanted to cover one of the underdogs, first.

The BeagleBone Black is currently at revision “C,” and this is the version I own. The great thing about the BeagleBone Black is that it includes an eMMC chip for on board memory storage, and this is where the built in OS lives. Revision “C” comes with a 4GB eMMC, and is pre-installed with Debian Wheezy. Plugging the board into a USB port on your computer using a USB-mini cable will both power the board and provide a USB ethernet connection to the board. The new virtual interface should get the IP address 192.168.7.1, and the board’s IP should be 192.168.7.2 so that you can log into it. The root account has an empty password by default.

This board includes a power jack for an external power brick so that power hungry accessories won’t draw too much load. It offers a single standard USB port for USB host support, a micro HDMI port for external display. A microSD slot allows for installation of other operating systems without overwriting the eMMC OS, which makes it somewhat versatile. OpenBSD can be installed on this device, which is one of the reasons I wanted to pick this up, but it is still a somewhat new port, so some functionality may be limited. The JTAG port works well to get a serial console into the system, as well. There is also a standard RJ45 jack for a 10/100 ethernet connection.

The processor is a 1GHz, 2000 MIPS Sitara from Texas Instruments. It has more than enough umph for the light workloads we’ll be using in the Lab.

Expansion boards that utilize the GPIO pins are called “capes” in the Beagle Board community. I link to one of these at the bottom of this article. There are other boards offered, and some of them are a lot more powerful and a lot more expensive. The BeagleBoard X15 was just recently released, for example, and costs around $230 to $250, but it has on board gigabit ethernet plus quite a few other peripheral options. I might drop some coin on one for the lab later, especially if OpenBSD brings it into the fold of supported hardware. Until then, the BeagleBone Black is more than sufficient for the kind of testing we’ll be doing.

If you are looking to get into, or try to expand your knowledge of penetration testing techniques, there is also an excellent book on using a handful of these boards specifically for that purpose. Dr. Phil Polstra

BeagleBone Black

Here’s the run down on the bare essentials for this board, and where to get them. Don’t worry, guys. While I definitely would include an affiliate link to help fund this project, Amazon won’t allow Arkansas residents to participate in their A-Store program, so all links are non-affiliate, (even the non-Amazon ones.)

The Board This contains the board, a case, a power supply, and a USB cable for use with the miniUSB client port near the RJ45 jack.

GearMo USB to 3.3v TTL Header like FTDI TTL-232R-3V3 Note that this cable is a 3.3V cable. The Raspberry PI uses a 5V cable. Be careful that you use the correct cable with the correct device if you mix and match like I did.

Samsung EVO 32GB Class 10 Micro SDHC Card These came on sale for ridiculously low prices a few times, so we got them in sets of three or more. Class 10 cards are highly recommended for use with these small Single Board Computing devices. While not necessary with the BeagleBone, it is nice to have options (like OpenBSD) as well as some external storage.

Hacking and Penetration Testing with Low Power Devices The book by Dr Phil Polstra.

Book and Cape bundle I hit up Dr Phil about this a little late, so I’m not sure if this is still valid or not. You might want to contact him on Twitter to verify before pulling the trigger on this, but I included it in case it still works.

EDIT: I got a response from Dr Phil after this post went live.

Sorry, I just got this message. Yes, I do still sell the kits. I have been selling the kits separate from the book mostly because Syngress won’t offer any discounts on my own book unless I buy 50 at a time so people are better off with Amazon etc. Part of the reason I now publish with Pentester Academy.